Why you ask?
They are the most versatile dress EVER!
It can be worn year round. In the summer wear it as and when it's cold just add a shirt underneath.
It's a dress now and a shirt later.
It can be embellished in a zillion different ways: Ruffles, appliques, fabric flowers, monograms, etc.
It's a great beginner project.
It's a quick satisfying project that can be made in 30 minutes or less.
Most sizes take a yard or less of fabric.
You can use any type of fabric. Cotton, flannel, fleece, linen, silk, minky, corduroy, etc.
THE POSSIBILITIES ARE ENDLESS!!!!
SUPPLIES NEEDED:
- Fabric
- Thread
- Bias Tape
- Ribbon
- Sewing machine
- Scissors
- Iron

Cut your fabric.
For the width measure the child's chest x 2 = width to cut fabric
measured from the shoulder to where I wanted the hem to be. Add 3" to this measurement and that's your length.

Fold the fabric in half width wise matching the corners. You are going to cut a backwards "J".
Cut it 5" long and 2.5" wide, as shown in the photo above.
With right sides together pin the long sides together.
Sew or serge.

Here's how it will look.
Iron your seams to the same side.
From the bottom, measure 1/2" and pin. Iron to set.

Measure and fold another 1.5" and iron.
Sew the hem.
Cut a piece of bias tape long enough to fit around the armhole. You can leave a little extra on either side if you want. If you are a beginner this is a good idea.

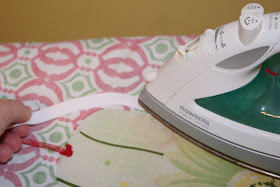
To shape the bias tape lay it on top of the dress next to the armhole. You are going to iron and turn/pull on the bias tape as you are ironing. This will curve the bias tape. You will need to do this a few times to get it curved enough to fit the armhole.

Here's how it should look.

Pin the bias tape to the armhole. Make sure when pinning the bias tape the shorter side is on top and the longer side is on bottom. {see picture}
Sew the bias tape 1/8" from the edge.
Now we are going to make a casing for the ribbon tie.
Fold up 1/4' and then 1'5" and iron.
Sew the casing. Make sure to back stitch at the beginning and the end.

Thread ribbon through the casing you just made.
Step back and admire your work.


I, too, love the simplicity of the pillowcase dress. I also love your Christmas version of the dress and the idea to wear it in the winter with layers... Thanks!
ReplyDeleteGreat Fabric choices! Great job on the tutorial.
ReplyDeleteThanks for linking up to Making It With Allie! I can't wait to see what you have for next week!
AllieMakes.Blogspot.com
Beautiful! Love the pattern I'm blog hopping and found your blog. I'm a new follower. Would love for you to check out my blog and follow back!
ReplyDeleteCool!! I usually only think of pillow case dresses for Summer....but you've changed my mind, lady!! I love it. Thanks!!
ReplyDeleteSo cute! Love the fabrics you chose!
ReplyDeleteThanks for sharing. I have begun sewing again and make my own bias tape, which is a pain with two little ones. I may just have to buy some.
ReplyDeleteThanks for the tutorial! I just made this dress (it was my first dress to ever sew!) & I was able to make it with no problems thanks to your great instructions & photos! Thanks again!
ReplyDelete